Menu
Menu


BROADCAST FILM AND VIDEO DIRECTORY
Broadcast News

10/10/2017
The Making Of 'Fire And Iron'
I've been shooting with the Fujinon MK18-55mm lens on my PXW-FS7 and PXW-FS5 since the lens was launched. I absolutely love this lens, but one thing has frustrated me: I really wanted to be able to use it on my PMW-F5 to take advantage of the 16 bit raw. Finally my dreams have come true as both Duclos and MTF have started making alternate rear mounts for both the MK18-55mm and the MK50-135mm.
So, when Fujinon contacted me and asked if I would be interested in shooting a short film with these lenses on my F5 I jumped at the chance. The only catch was that this was just over a week ago and the video was wanted for IBC which means it needed to be ready yesterday. And of course it goes without saying that it has to look good – no pressure then!
First challenge – come up with something to shoot. Something that would show off the key features of these beautiful lenses – image quality, weight, macro, etc. I toyed with hiring a model and travelling to the Irish or Welsh coast and filming along the cliffs and mountains. But it's the summer holidays so there was a risk of not being able to get an isolated location all to ourselves, plus you never know what the weather is going to do. In addition, there was no story, no beginning, middle or end and I really wanted to tell some kind of story rather than just a montage of pretty pictures.
So my next thought was to shoot an artist creating something. I spent a weekend googling various types of artistry until I settled on a blacksmith. The video was going to be shown in both SDR and HDR and fire always looks good in HDR. So after dozens of emails and telephone calls I found an amazing looking metalwork gallery and blacksmith that was willing for a reasonable fee to have me and another cameraman take over their workshop for a day (BIG thank you to Adam and Lucy at Fire and Iron; check out their amazing works of art).
Normally I'd carry out a recce of a location before a shoot to take photos and figure out what kind of lights I would need as well as any other specialist or unusual equipment. But this time there simply wasn't time. We would be shooting the same week and it was already a very busy week for me.
The next step before any shoot for me is some degree of planning. I like to have a concept for the video, at the very least some outline of the shots I need to tell the story, perhaps not a full storyboard, but at least some kind of structure. Once you have figured out the shots that you want to get you can then start to think about what kind of equipment you need to get those shots. In this case, as we would be shooting static works of art I felt that having ways to move the camera would really enhance the video. I have a small Jib as well as some track and a basic dolly that is substantial enough to take the weight of a fully configured PMW-F5 so these would be used for the shoot (I'm also now looking for a slider suitable for the F5/F55 that won't break the bank, so let me know if you have any recommendations).
So the first items on my kit list after the camera and lenses (the lenses were fitted with Duclos FZ rear mounts) was the jib and dolly. To achieve a nice shallow depth of field I planned to shoot as close to the lenses largest aperture of T2.9 as possible. This presents 2 challenges. The F5's internal ND filters go in 3 stop steps – that's a big step and I don't want to end up at T5.6 when really I want T2.9, so 1 stop and 2 stop ND filters and my gucchi wood finished Vocas matte box would be needed (the wood look does nothing to help the image quality, but it looks cool). Oh, for the FS7 II's variable ND filter in my F5!
The second problem of shooting everything at T2.9 with a super 35mm sensor is that focus would be critical and I was planning on swinging the camera on a jib. So I splashed out on a new remote follow focus from PDMovie as they are currently on offer in the UK. This is something I've been meaning to get for a while. As well as the remote follow focus I added my Alphatron ProPull follow focus to the kit list. The Fujinon MK lenses have integrated 0.8 pitch gears so using a follow focus is easy. I now wish that I had actually purchased the more expensive PDMovie follow focus kit that has 2 motors as this would allow me to electronically zoom the lens as well as focus it. Oh well, another thing to add to my wish list for the future.
One other nice feature of the Fujinon MKs is that because they are parfocal you can zoom in to focus and then zoom out for the wider shot and be 100% sure that there is no focus shift and that the image will be tack sharp. Something you can’t do with DSLR lenses.
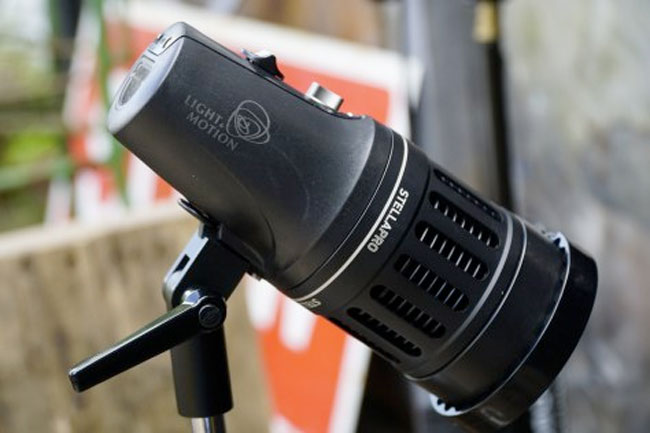
Lighting: This was a daylight shoot. Now I have to say that I am still a big fan of old school tungsten lighting. You don't get any odd color casts, it gives great skin tones, it's cheap and the variety and types of lamp available is vast. But as we all know it needs a lot of power and gets hot. Plus if you want to mix tungsten with daylight you have to use correction gels which makes the lights even less efficient. So for this shoot I packed my Light and Motion Stella lamps.
The Stellas are daylight balanced LED lamps with nice wide 120 degree beams. You can then use various modifiers to change this. I find the 25 degree fresnel and the Stella 5000 a particularly useful combination. This is the equivalent to a 650W tungsten lamp but without the heat. The fresnel lens really helps when lighting via a diffuser or bounce as it controls the spill levels making it easier to control the overall contrast in the shot. The Stella lights have built in batteries or can be run from the mains. They are also waterproof, so even if it rained I would be able to have lights outside the workshop shining in through the windows if needed.
I always carry a number of pop-up diffusers and reflectors of various sizes along with stands and arms specifically designed to hold them. These are cheap but incredibly useful. I find I end up using at least one of these on almost every shoot that I do. As well as a couple of black flags I also carry black drapes to place on the floor or hang from stands to reduce reflections and in effect absorb unwanted light.
To check my images on set I use an Atomos Shogun Flame. Rather than mounting it on the camera, for this shoot I decided to pack an extra heavy duty lighting stand to support the Shogun. This would allow my assistant to use the flame to check focus while I was swinging the jib. The HDR screen on the Shogun allows me to see a close approximation of how my footage will look after grading. It also has peaking and a zoom function to help with focussing which was going to be essential when the camera was up high on the jib and being focussed remotely. I also included a TV-Logic LUM171G which is a 17" grading quality monitor with 4K inputs. The larger screen is useful for focus and it's colour accuracy helpful for checking exposure etc.
For audio I packed my trusty UWP-D wireless mic kit and a pair of headphones. I also had a shotgun mic and XLR cable to record some atmos.
As well as all the larger items of kit there's also all the small bits and bobs that help a shoot go smoothly. A couple of rolls of gaffer tape, crocodile clips, sharpies, spare batteries, extension cables, etc. One thing I've found very useful is an equipment cart. I have a modified rock-n-roller cart with carpet covered shelves. Not only does this help move all the kit around but it also acts as a desk on location. This is really handy when swapping lenses or prepping the camera. It can save quite a bit of time when you have a mobile work area and somewhere you can put lenses and other frequently used bits of kit.
The day before the shoot I set everything up and tested everything. I checked the backfocus adjustment of the lenses. Checked the camera was working as expected and that I had the LUT's I wanted loaded into both the camera and the Gratical viewfinder. With the camera on the jib I made sure I had the right weights and that everything was smooth. I also checked that my light meter was still calibrated against the camera and that the lens apertures matched what I was expecting (which they did perfectly). Color temperature and colorimetry was checked on the TVLogic monitor.
It's worth periodically checking these things as there would be nothing worse than rocking up for the shoot only to find the camera wasn't performing as expected. If you rent a cinema camera package from a major rental house it would be normal to set the camera up on a test bench to check it over before taking it away. But it's easy to get lazy if it's your own kit and just assume it's all OK. A full test like this before an important shoot is well worth doing and it gives you a chance to set everything up exactly as it will be on the shoot saving time and stress at the beginning of the shoot day.
On the morning of the shoot I loaded up the car. I drive a people carrier (minivan to my friends in the USA). Once you start including things like a jib, track and dolly, equipment cart, 6x tungsten lights, 4 x LED lights, plus camera, tripods (including a very heavy duty one for the jib) the car soon fills up. A conventional saloon would not be big enough! One word of caution. I was involved in a car crash many years ago when the car rolled over. I had camera kit in the back of the car and the heavy flight cases did a lot of damage crashing around inside the car. If you do carry heavy kit in the car make sure it's loaded low down below the tops of the seats. You don't want everything flying forwards and hitting you on the back of your head in a crash. Perhaps consider a robust steel grill to put between the cargo compartment and the passenger compartment.
On arrival at the location, while it's very tempting to immediately start unloading and setting up, I like to take a bit of a break and have a tea or coffee first. I use this time to chat with the client or the rest of the crew to make sure everyone knows what's planned for the day. Taking a few minutes to do this can save a lot of time later and it helps everyone to relax a little before what could be a busy and stressful day.
Now it's time to unpack and setup. I find it's better to unpack all the gear at this time rather than stopping and starting throughout the day to unpack new bits of kit. Going to the car, unlocking, unpacking, locking, back to the set etc wastes time. This is where the equipment cart can be a big help as you can load up the cart with all those bits and pieces you "might" need… and inevitably do need.
The blacksmiths' workshop was a dark space about 6m x 5m with black walls, open on one side to the outside world. Blacksmiths' forges (so I learnt) are dark so that the blacksmith can see the glow of the metal as it heats up to gauge its temperature. On the one hand, this was great – huge amounts of relatively soft light coming from one direction. On the other hand, the dark side was very dark which would really push the camera and lenses due to the extreme contrast this would create.
We set the jib up inside the workshop to shoot the various processes used by a blacksmith when working with iron and steel. Apparently there are only 7 different processes and anything a blacksmith does will use just these 7 processes or variations of them.
Most of the shots done on the jib would be shot using the Fujinon MK18-55mm, so that's the lens we started with. For protection from flying sparks a clear glass filter was fitted to the lens. While the finished film would be a 24p film, most of the filming was 4K DCI at 60fps recording to 16 bit raw. This would give me the option to slow down footage to 24p in post if I wanted a bit of slow motion.
When we did need to do a lens swap it was really easy. The Vocas matte box I have is a swing-away matte box. So by releasing a lever on the bottom of the matte box it swings out of the way of the lens without having to remove it from the rods. Then I can remove the lens and swap it to the other lens. The MK50-135mm is the same size as the MK18-55mm. The pitch gears are also in the same place. So swapping lenses is super fast as the follow focus or any focus motors don't need to be re-positioned and the matte box just swings back to exactly the same position on the lens. It’s things like this that really separate pro cinema lenses from DSLR and photography lenses.
For exposure I used the cameras built in LUTs and the 709(800) LUT. I set the camera to 800EI. I used a grey card to establish a base exposure, exposing the grey card at 43% (measuring the 709 level). I used a Zacuto Gratical viewfinder which has a great built in waveform display, much better than the one in the camera. I also double checked my light levels with a light meter. I don't feel that it's essential to use a light meter but it's a useful safety net. The light meter is also handy for measuring contrast ratios across faces etc but again if you have a decent waveform display you don't have to have a light meter.
For the next three hours we shot the various processes seen in the video. Trying to get a variety of different shot. But when each process is quite similar, usually involving the anvil and a large hammer it was difficult to come up with shots that looked different.
In the afternoon we set up to shoot the interview sequence. The reason for doing this was to not only provide the narrative for the film but also to help show how the lenses reproduce skin tones. The Fujinon MK series lenses are what I would describe as "well rounded". That is, not too sharp but not soft either. They produce beautifully crisp pictures without the pictures looking artificially sharp and this really helps when shooting people and faces. They just look really nice.
For the interview shot I used one of the Stella 5000 lights with the 25 degree fresnel lens aimed through a 1m wide diffuser to add a little extra light to supplement the daylight. This allowed me to get some nice contrast across the blacksmiths face and nice "catch light" highlights in his eyes. In addition the little bit of extra light on his face meant that the back wall of the forge would appear just that bit darker due to the increased contrast between his face and the back wall. This is why we light… not just to ensure enough light to shoot with, I had plenty of light, if I remember right I had a 1 stop ND in the matte box. But to create contrast, it's the contrast that gives the image depth, it's contrast that makes an image look interesting.
The final stage was to shoot the treasure chest and ornate jars that would show off the the lenses macro and close up performance. The treasure chest is a truly amazing thing. It weighs around 80kg. The locking mechanism is quite fascinating and I still struggle to believe that it was all hand made. The small metal jars are made out of folded and welded steel. It's the folds in the metal that create the patterns that you see.
Once again we used the jib to add motion to the shots. I also used the macro function of both the MK18-55mm and MK50-135mm lenses. This function allows you to get within inches of the object that you are shooting. It's a great feature to have and it really adds to the versatility of these lenses.
The Zacuto Gratical has a much better waveform display than the camera's own, so it's a useful viewfinder to have.
We wrapped at 7pm. Time to pack away the kit. It's really important not to rush at this stage. Like everyone else I want to get home as quick as I can. But it's important to pack your kit carefully and properly. There is nothing more annoying than when you start prepping for the next shoot finding that something has been broken or is missing because you rushed to pack up at the end of the previous shoot. Once you have packed everything away don't forget to do that last walk through all the locations you've shot in to make sure you haven't forgotten something.
I shot a little over hour of material. As it was mostly 60p 4K raw that came to about 1.5TB This was backed up on site using a Nexto-DI NSB25 which is a stand alone device that makes 2 verified copies of everything on 2 different hard drives. The film was edited using Adobe Premiere CC which handles Sony's raw very easily. Grading was completed using DaVinci Resolve. I spent 2 days editing and a day grading the first version of the film. Then I spent another day re-grading it for HDR and producing the different versions that would be needed. All in, including coming up with the concept, finding the location, prepping, shooting and post took it took about 7 to 8 full work days to put this simple 4 minute film together.
Article credit: Alister Chapman.
(JP/MH)
So, when Fujinon contacted me and asked if I would be interested in shooting a short film with these lenses on my F5 I jumped at the chance. The only catch was that this was just over a week ago and the video was wanted for IBC which means it needed to be ready yesterday. And of course it goes without saying that it has to look good – no pressure then!
First challenge – come up with something to shoot. Something that would show off the key features of these beautiful lenses – image quality, weight, macro, etc. I toyed with hiring a model and travelling to the Irish or Welsh coast and filming along the cliffs and mountains. But it's the summer holidays so there was a risk of not being able to get an isolated location all to ourselves, plus you never know what the weather is going to do. In addition, there was no story, no beginning, middle or end and I really wanted to tell some kind of story rather than just a montage of pretty pictures.
So my next thought was to shoot an artist creating something. I spent a weekend googling various types of artistry until I settled on a blacksmith. The video was going to be shown in both SDR and HDR and fire always looks good in HDR. So after dozens of emails and telephone calls I found an amazing looking metalwork gallery and blacksmith that was willing for a reasonable fee to have me and another cameraman take over their workshop for a day (BIG thank you to Adam and Lucy at Fire and Iron; check out their amazing works of art).
Normally I'd carry out a recce of a location before a shoot to take photos and figure out what kind of lights I would need as well as any other specialist or unusual equipment. But this time there simply wasn't time. We would be shooting the same week and it was already a very busy week for me.
The next step before any shoot for me is some degree of planning. I like to have a concept for the video, at the very least some outline of the shots I need to tell the story, perhaps not a full storyboard, but at least some kind of structure. Once you have figured out the shots that you want to get you can then start to think about what kind of equipment you need to get those shots. In this case, as we would be shooting static works of art I felt that having ways to move the camera would really enhance the video. I have a small Jib as well as some track and a basic dolly that is substantial enough to take the weight of a fully configured PMW-F5 so these would be used for the shoot (I'm also now looking for a slider suitable for the F5/F55 that won't break the bank, so let me know if you have any recommendations).
So the first items on my kit list after the camera and lenses (the lenses were fitted with Duclos FZ rear mounts) was the jib and dolly. To achieve a nice shallow depth of field I planned to shoot as close to the lenses largest aperture of T2.9 as possible. This presents 2 challenges. The F5's internal ND filters go in 3 stop steps – that's a big step and I don't want to end up at T5.6 when really I want T2.9, so 1 stop and 2 stop ND filters and my gucchi wood finished Vocas matte box would be needed (the wood look does nothing to help the image quality, but it looks cool). Oh, for the FS7 II's variable ND filter in my F5!
The second problem of shooting everything at T2.9 with a super 35mm sensor is that focus would be critical and I was planning on swinging the camera on a jib. So I splashed out on a new remote follow focus from PDMovie as they are currently on offer in the UK. This is something I've been meaning to get for a while. As well as the remote follow focus I added my Alphatron ProPull follow focus to the kit list. The Fujinon MK lenses have integrated 0.8 pitch gears so using a follow focus is easy. I now wish that I had actually purchased the more expensive PDMovie follow focus kit that has 2 motors as this would allow me to electronically zoom the lens as well as focus it. Oh well, another thing to add to my wish list for the future.
One other nice feature of the Fujinon MKs is that because they are parfocal you can zoom in to focus and then zoom out for the wider shot and be 100% sure that there is no focus shift and that the image will be tack sharp. Something you can’t do with DSLR lenses.
Lighting: This was a daylight shoot. Now I have to say that I am still a big fan of old school tungsten lighting. You don't get any odd color casts, it gives great skin tones, it's cheap and the variety and types of lamp available is vast. But as we all know it needs a lot of power and gets hot. Plus if you want to mix tungsten with daylight you have to use correction gels which makes the lights even less efficient. So for this shoot I packed my Light and Motion Stella lamps.
The Stellas are daylight balanced LED lamps with nice wide 120 degree beams. You can then use various modifiers to change this. I find the 25 degree fresnel and the Stella 5000 a particularly useful combination. This is the equivalent to a 650W tungsten lamp but without the heat. The fresnel lens really helps when lighting via a diffuser or bounce as it controls the spill levels making it easier to control the overall contrast in the shot. The Stella lights have built in batteries or can be run from the mains. They are also waterproof, so even if it rained I would be able to have lights outside the workshop shining in through the windows if needed.
I always carry a number of pop-up diffusers and reflectors of various sizes along with stands and arms specifically designed to hold them. These are cheap but incredibly useful. I find I end up using at least one of these on almost every shoot that I do. As well as a couple of black flags I also carry black drapes to place on the floor or hang from stands to reduce reflections and in effect absorb unwanted light.
To check my images on set I use an Atomos Shogun Flame. Rather than mounting it on the camera, for this shoot I decided to pack an extra heavy duty lighting stand to support the Shogun. This would allow my assistant to use the flame to check focus while I was swinging the jib. The HDR screen on the Shogun allows me to see a close approximation of how my footage will look after grading. It also has peaking and a zoom function to help with focussing which was going to be essential when the camera was up high on the jib and being focussed remotely. I also included a TV-Logic LUM171G which is a 17" grading quality monitor with 4K inputs. The larger screen is useful for focus and it's colour accuracy helpful for checking exposure etc.
For audio I packed my trusty UWP-D wireless mic kit and a pair of headphones. I also had a shotgun mic and XLR cable to record some atmos.
As well as all the larger items of kit there's also all the small bits and bobs that help a shoot go smoothly. A couple of rolls of gaffer tape, crocodile clips, sharpies, spare batteries, extension cables, etc. One thing I've found very useful is an equipment cart. I have a modified rock-n-roller cart with carpet covered shelves. Not only does this help move all the kit around but it also acts as a desk on location. This is really handy when swapping lenses or prepping the camera. It can save quite a bit of time when you have a mobile work area and somewhere you can put lenses and other frequently used bits of kit.
The day before the shoot I set everything up and tested everything. I checked the backfocus adjustment of the lenses. Checked the camera was working as expected and that I had the LUT's I wanted loaded into both the camera and the Gratical viewfinder. With the camera on the jib I made sure I had the right weights and that everything was smooth. I also checked that my light meter was still calibrated against the camera and that the lens apertures matched what I was expecting (which they did perfectly). Color temperature and colorimetry was checked on the TVLogic monitor.
It's worth periodically checking these things as there would be nothing worse than rocking up for the shoot only to find the camera wasn't performing as expected. If you rent a cinema camera package from a major rental house it would be normal to set the camera up on a test bench to check it over before taking it away. But it's easy to get lazy if it's your own kit and just assume it's all OK. A full test like this before an important shoot is well worth doing and it gives you a chance to set everything up exactly as it will be on the shoot saving time and stress at the beginning of the shoot day.
On the morning of the shoot I loaded up the car. I drive a people carrier (minivan to my friends in the USA). Once you start including things like a jib, track and dolly, equipment cart, 6x tungsten lights, 4 x LED lights, plus camera, tripods (including a very heavy duty one for the jib) the car soon fills up. A conventional saloon would not be big enough! One word of caution. I was involved in a car crash many years ago when the car rolled over. I had camera kit in the back of the car and the heavy flight cases did a lot of damage crashing around inside the car. If you do carry heavy kit in the car make sure it's loaded low down below the tops of the seats. You don't want everything flying forwards and hitting you on the back of your head in a crash. Perhaps consider a robust steel grill to put between the cargo compartment and the passenger compartment.
On arrival at the location, while it's very tempting to immediately start unloading and setting up, I like to take a bit of a break and have a tea or coffee first. I use this time to chat with the client or the rest of the crew to make sure everyone knows what's planned for the day. Taking a few minutes to do this can save a lot of time later and it helps everyone to relax a little before what could be a busy and stressful day.
Now it's time to unpack and setup. I find it's better to unpack all the gear at this time rather than stopping and starting throughout the day to unpack new bits of kit. Going to the car, unlocking, unpacking, locking, back to the set etc wastes time. This is where the equipment cart can be a big help as you can load up the cart with all those bits and pieces you "might" need… and inevitably do need.
The blacksmiths' workshop was a dark space about 6m x 5m with black walls, open on one side to the outside world. Blacksmiths' forges (so I learnt) are dark so that the blacksmith can see the glow of the metal as it heats up to gauge its temperature. On the one hand, this was great – huge amounts of relatively soft light coming from one direction. On the other hand, the dark side was very dark which would really push the camera and lenses due to the extreme contrast this would create.
We set the jib up inside the workshop to shoot the various processes used by a blacksmith when working with iron and steel. Apparently there are only 7 different processes and anything a blacksmith does will use just these 7 processes or variations of them.
Most of the shots done on the jib would be shot using the Fujinon MK18-55mm, so that's the lens we started with. For protection from flying sparks a clear glass filter was fitted to the lens. While the finished film would be a 24p film, most of the filming was 4K DCI at 60fps recording to 16 bit raw. This would give me the option to slow down footage to 24p in post if I wanted a bit of slow motion.
When we did need to do a lens swap it was really easy. The Vocas matte box I have is a swing-away matte box. So by releasing a lever on the bottom of the matte box it swings out of the way of the lens without having to remove it from the rods. Then I can remove the lens and swap it to the other lens. The MK50-135mm is the same size as the MK18-55mm. The pitch gears are also in the same place. So swapping lenses is super fast as the follow focus or any focus motors don't need to be re-positioned and the matte box just swings back to exactly the same position on the lens. It’s things like this that really separate pro cinema lenses from DSLR and photography lenses.
For exposure I used the cameras built in LUTs and the 709(800) LUT. I set the camera to 800EI. I used a grey card to establish a base exposure, exposing the grey card at 43% (measuring the 709 level). I used a Zacuto Gratical viewfinder which has a great built in waveform display, much better than the one in the camera. I also double checked my light levels with a light meter. I don't feel that it's essential to use a light meter but it's a useful safety net. The light meter is also handy for measuring contrast ratios across faces etc but again if you have a decent waveform display you don't have to have a light meter.
For the next three hours we shot the various processes seen in the video. Trying to get a variety of different shot. But when each process is quite similar, usually involving the anvil and a large hammer it was difficult to come up with shots that looked different.
In the afternoon we set up to shoot the interview sequence. The reason for doing this was to not only provide the narrative for the film but also to help show how the lenses reproduce skin tones. The Fujinon MK series lenses are what I would describe as "well rounded". That is, not too sharp but not soft either. They produce beautifully crisp pictures without the pictures looking artificially sharp and this really helps when shooting people and faces. They just look really nice.
For the interview shot I used one of the Stella 5000 lights with the 25 degree fresnel lens aimed through a 1m wide diffuser to add a little extra light to supplement the daylight. This allowed me to get some nice contrast across the blacksmiths face and nice "catch light" highlights in his eyes. In addition the little bit of extra light on his face meant that the back wall of the forge would appear just that bit darker due to the increased contrast between his face and the back wall. This is why we light… not just to ensure enough light to shoot with, I had plenty of light, if I remember right I had a 1 stop ND in the matte box. But to create contrast, it's the contrast that gives the image depth, it's contrast that makes an image look interesting.
The final stage was to shoot the treasure chest and ornate jars that would show off the the lenses macro and close up performance. The treasure chest is a truly amazing thing. It weighs around 80kg. The locking mechanism is quite fascinating and I still struggle to believe that it was all hand made. The small metal jars are made out of folded and welded steel. It's the folds in the metal that create the patterns that you see.
Once again we used the jib to add motion to the shots. I also used the macro function of both the MK18-55mm and MK50-135mm lenses. This function allows you to get within inches of the object that you are shooting. It's a great feature to have and it really adds to the versatility of these lenses.
The Zacuto Gratical has a much better waveform display than the camera's own, so it's a useful viewfinder to have.
We wrapped at 7pm. Time to pack away the kit. It's really important not to rush at this stage. Like everyone else I want to get home as quick as I can. But it's important to pack your kit carefully and properly. There is nothing more annoying than when you start prepping for the next shoot finding that something has been broken or is missing because you rushed to pack up at the end of the previous shoot. Once you have packed everything away don't forget to do that last walk through all the locations you've shot in to make sure you haven't forgotten something.
I shot a little over hour of material. As it was mostly 60p 4K raw that came to about 1.5TB This was backed up on site using a Nexto-DI NSB25 which is a stand alone device that makes 2 verified copies of everything on 2 different hard drives. The film was edited using Adobe Premiere CC which handles Sony's raw very easily. Grading was completed using DaVinci Resolve. I spent 2 days editing and a day grading the first version of the film. Then I spent another day re-grading it for HDR and producing the different versions that would be needed. All in, including coming up with the concept, finding the location, prepping, shooting and post took it took about 7 to 8 full work days to put this simple 4 minute film together.
Article credit: Alister Chapman.
(JP/MH)
More Broadcast Lighting Equipment Stories
01/04/2019
WORK PRO Upgrades Its LightShark DMX-Based Hardware Lighting Console
WORK PRO has announced a significant software upgrade for its LightShark DMX-based hardware lighting console, resulting in major improvements to its f
WORK PRO Upgrades Its LightShark DMX-Based Hardware Lighting Console
WORK PRO has announced a significant software upgrade for its LightShark DMX-based hardware lighting console, resulting in major improvements to its f
28/09/2018
Kino Flo Debuts New L80 And L40 LED Image Fixtures At IBC 2018
Kino Flo Lighting Systems unveiled the new L80 and L40 LED Image fixtures at the IBC show in Amsterdam. The new style Image LED fixtures appear outwar
Kino Flo Debuts New L80 And L40 LED Image Fixtures At IBC 2018
Kino Flo Lighting Systems unveiled the new L80 and L40 LED Image fixtures at the IBC show in Amsterdam. The new style Image LED fixtures appear outwar
10/04/2018
Lights, Camera… Hollywood Glamour Meets 1970s Liverpool
Whether you're watching a post-apocalyptic thriller, film noir, or period drama, lighting is one of the elements that helps convince you of what you'r
Lights, Camera… Hollywood Glamour Meets 1970s Liverpool
Whether you're watching a post-apocalyptic thriller, film noir, or period drama, lighting is one of the elements that helps convince you of what you'r
12/03/2018
LED Creative Styles BRITs Official After Party
LED Creative has worked alongside Lighting Designer (LD) Stuart Pring to provide light installations for the BRITs after party. LED Creative used its
LED Creative Styles BRITs Official After Party
LED Creative has worked alongside Lighting Designer (LD) Stuart Pring to provide light installations for the BRITs after party. LED Creative used its
07/03/2018
In Depth With Gavo Light
Gavo Lighting are revolutionising the market when it comes to plasma lighting. Having recently exhibited the Gavo Light, the team tell us about its su
In Depth With Gavo Light
Gavo Lighting are revolutionising the market when it comes to plasma lighting. Having recently exhibited the Gavo Light, the team tell us about its su
20/02/2018
LED Creative Add Sparkle To Dancing On Ice
LED Creative has provided more than 1,600 metres of their Alpha 60 RGB system, as well as an additional 75 metres of their Sigma 60, for the new serie
LED Creative Add Sparkle To Dancing On Ice
LED Creative has provided more than 1,600 metres of their Alpha 60 RGB system, as well as an additional 75 metres of their Sigma 60, for the new serie
16/02/2018
In Conversation With Gavo Lighting
Your stand was buzzing at BSC; what was the greatest talking point? Visitors to our stand at the BSC show were curious at first and blown away second.
In Conversation With Gavo Lighting
Your stand was buzzing at BSC; what was the greatest talking point? Visitors to our stand at the BSC show were curious at first and blown away second.
05/12/2017
Purify Lighting With Remote Phosphor From BB&S
The popularity of LED-based fixtures has grown enormously in a short period – owing to its 'bang for buck' in terms of quality versus investment. Howe
Purify Lighting With Remote Phosphor From BB&S
The popularity of LED-based fixtures has grown enormously in a short period – owing to its 'bang for buck' in terms of quality versus investment. Howe
13/10/2017
What Makes A Professional Light?
At IBC last month, it was eye-opening how many lighting manufacturers were exhibiting – not least because of their bright booths! This influx of new m
What Makes A Professional Light?
At IBC last month, it was eye-opening how many lighting manufacturers were exhibiting – not least because of their bright booths! This influx of new m
10/10/2017
The Making Of 'Fire And Iron'
I've been shooting with the Fujinon MK18-55mm lens on my PXW-FS7 and PXW-FS5 since the lens was launched. I absolutely love this lens, but one thing h
The Making Of 'Fire And Iron'
I've been shooting with the Fujinon MK18-55mm lens on my PXW-FS7 and PXW-FS5 since the lens was launched. I absolutely love this lens, but one thing h